Sushi is one of our all time favorite foods. Which is kinda wild considering I turned my nose up to it until I was in my late twenties. I will never forget the first time I had it, it was like a level of food had been unlocked. Now, the price of a handmade sushi roll is what keeps me from eating it as often as I would like.
Homemade Sushi Rolls are a fun meal to make at home. and our kids love them too! This homemade sushi recipe with imitation crab, cream cheese, avocado, and cucumbers is a great easy beginner sushi roll to make at home! *This post may contain Affiliate links
Something we love about making sushi at home is that it is great to make your own! So if you have one member who loves Philadelphia Rolls you can always ‘jazz up’ this recipe as well by adding what you need or subbing out the crab for some shredded carrots to get a veggie rolls for the people who don’t love crab. It’s a win-win!
*This post contains affiliate links, DISCLOSURE which means I may earn a small commission if you shop through my links — at no extra cost to you.
| Supplies |
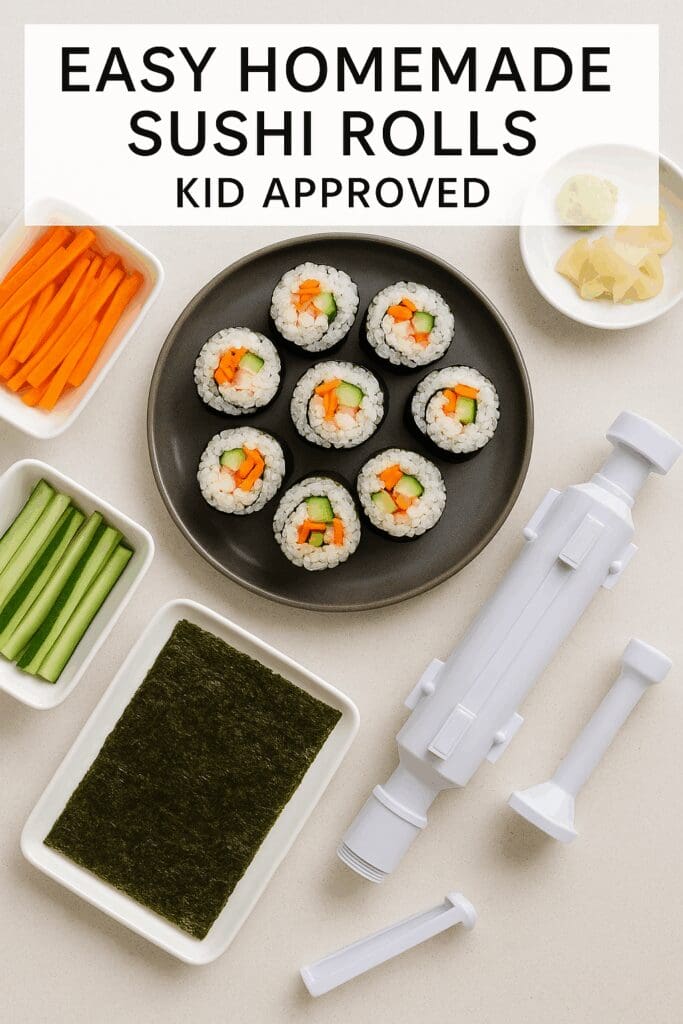
You need a few special supplies for rolling sushi but these are not supplies were easy to snag at the store! We actually purchased THIS SUSHI MAT SET on amazon and we loved that it came with everything we needed except ingredients. It even had these cute little whale chop stick holders our kids are obsessed with!
- Sushi Mat – A sushi mat does not have to be fancy, but you do need one to get the correct roll…haha see what I did there 😉
- Pot with Lid – for cooking the rice, a lot of people do not have rice cookers at home so although we typically use our Instantpot for rice, but for this recipe we made it on the stove.
- Whisk – for the rice vinegar
- Serrated Knife – a serrated knife typically works best for slicing the sushi
- Chopsticks & Small Bowls – not mandator but it’s so much more fun to have them. It definitely makes the whole experience. Small bowls for soy sauce or wasabi/ginger
- Rice Paddle – also optional and our kids loved using their hands but some people don’t like the sticky texture of the rice.
- Soy Sauce, Pickled Ginger, & Wasabi – for sides! You and your family might not like wasabi or the sushi ginger so you don’t have to get it but we love both in our house!
- Avocado – you will want the ripe with a little firmness still, too soft and it might be hard to work with
- Cream Cheese – maybe this is just our family, but we are BIG fans of fans of any sushi that has cream cheese! YUM! This is always an option we want. *We like to cut our cream cheese when it is really cold into longer strips and then put it back in the refrigerator until we are ready to use it. Cream cheese when it’s too soft is really hard to work with.
- English Cucumber – we prefer the English Cucumber because it has a lot less seeds and water inside and more of that crunch. You can use a traditional cucumber as a well though
- Imitation Crab – Looking for it in the log shape’ or leg style, it should be as long as the package. This makes making the sushi a lot easier that if it is in the ‘chunk style’
- Seaweed Nori – Lastly and probably equally as important as the rice is the Seaweed Nori! You can guy it at any grocery story but we buy it from Amazon because the packs from the store usually only have about 10 sheets. Who is that enough for!? We buy this Organic Roasted Seaweed and it’s great!
*This recipe is really a two part recipe because we always start with the sticky rice! This Sushi Rice Recipe is really sticky and a little sweet, which makes it perfect for making your own sushi rolls at home. This perfectly sticky rice is easy to make and lasts for days in the refrigerator.
Shop our AMAZON STORE for all of our kitchen essentials
*This post contains Affiliate links
The Best Sticky Rice Recipe
| Ingredients |
- 2 CUPS sushi rice ( Nishiki brand or Kokuho Rice)
- 2 CUPS water,
- 2 TBSP rice vinegar
- 2 TBSP organic cane sugar
- 1/2 cup shredded cheddar cheese
- 1 TBSP salt
Sushi Rice Cooking Tips :
- Only use sushi rice – Sushi rice which is a particular form of short grain rice and that is what makes it so sticky. We use Nishiki brand and Kokuho Rice we love them both. Don’t try to use the standard long grain rice you already have in your cupboard or your roll will not work. Unless you like mushy textured sushi that is…
- Rinse your uncooked sushi rice extra – It may seem odd or an unnecessary step, but be sure you rinse your rice until the water runs clear. This step is skipped by people in a rush but we promise it is worth avoiding the pasta like flavor that holds onto!
- Wait till it cools – Allow the rice to come to room temperature before using. As the rice cools, it will become even stickier…. so don’t rush this process. It’s worth the wait.
| Process |
- Prep: Strain and rinse the rice until the water runs clear. (Usually 5 minutes to do this) Use your hands to be sure all the grains are rinsed well. Place the rinsed rice into a medium pan with the 2 cups of water.
- Cook: Over a high heat, bring the water to a boil. Once the water begins to boil, cover the pot and reduce the heat to the very lowest setting. Cook for 15 minutes. Once the rice is done, remove from heat, leave the lid ON and let it sit for another 10 minutes.
- Combine: Vinegar, sugar and salt in a small cup and heat for 30 seconds. Once the has sat for 10 minutes, add the liquid and mix it well. Allow the rice to come to room temperature before using.
- Set aside and let it cool while you prep your sushi ingredients. I like to do it after the rice is finished that way everything stays fresh and I allow enough time for the rice to cool COMPLETELY. This is important…remember!! 😉
*You can store leftover rice in the refrigerator in an airtight container for up to one week.
Creating your sushi roll
Once rice is ready measure it out into a 1 cup measuring cup, you will use about 1 cup of rice per roll.
*We are putting two methods of rolling the sushi in case you are using the kit provided and have the tube! It’s fun to use and the kids think its way better than laying the rice evenly.
TUBE METHOD:
- Load the tube with rice and with the center pole, you press an indentation for your ingredients.
- Load long strips of various ingredients into center of the roll – you can actually fit a pretty good amount in each!
- Close the tube and snap it closed (don’t forget to inset the pusher at one end)
- Using the provided pushing stick, push the sushi out onto your seaweed roll! It’s weirdly satisfying.
- Now using your sushi mat, carefully roll the sushi. Then pulling the mat tightly over it, roll it again. Pull down the mat off the seaweed and roll the rest of the roll up to create a loaf shape. Pick up the roll and gently give it a squeeze to keep it in a circular shape. Now unwrap the mat and TADA!!!!
- Dip your serrated knife in water first to prevent it from sticking. We loved the sushi cutting guide provided in the kit and it came in handy during this part. Sushi can sometimes squish or fall apart if you aren’t careful.
- Top with eel sauce or whatever makes your sushi heart sing and ENJOY!
Here is a video clip of us making one!
TRADITIONAL ROLL METHOD
The only big different between using the sushi tube and rolling it yourself is to replace steps 1-4 with this:
1. Take a sheet of seaweed and lay the shinier side down on the sushi mat. Transfer the 1 CUP of rice onto the center of the seaweed. Dip your fingers in water and spread out the rice to the bottom, sides and to the top of the seaweed leaving a 1″ gap – you’ll use this to seal it closed.
See, easy! 😉
Please let us know if you enjoy this recipe or what else you would like to see more of!


COMMENTS